- Other Fluke companies:
- Fluke
- Fluke Biomedical
- Fluke Networks
- Fluke Process Instruments
Inside Fluke’s most accurate multimeters: the 8588A and 8558A 8.5-digit digital multimeters
What is a digital multimeter?
A digital multimeter measures an electrical parameter, such as voltage, current, or resistance, with accurate and repeatable techniques to properly support various testing and measurement purposes in industry, science and technology. Over time, measurements made by digital multimeters have evolved, expanding the ways scientists, engineers and technicians make measurements.
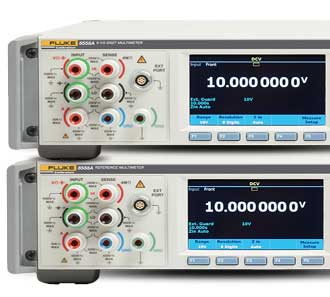
The precision of digital multimeter measurements now can provide values which resolve well into the tens of millionths, with absolute accuracies as good as or better than several parts out of a million. Additionally, the speed and timing synchronization of the measurement process are such that measurements of dynamically changing parameters can be routinely made. Modern digital multimeters have evolved far beyond being indicators of general measured electrical test quantities.
With the introduction of the latest Fluke 8588A and 8558A high performance digital multimeters, several new and innovative design improvements have taken these capabilities even further. This application note describes the improvements of Fluke’s most accurate multimeters and how they might be applied, so users of these digital multimeters may take advantage of the new capabilities in easier and more thorough ways.
Digital multimeter architecture
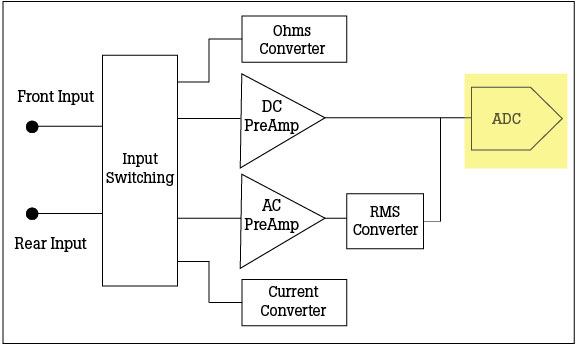
All digital multimeters have a common core type of architecture. The simplified block diagram in Figure 1 shows a typical design of a basic five-function digital multimeter. The heart of the system is the analog-to-digital converter, indicated as an ADC or A/D converter. It makes nearly all the amplitude related measurements. The ADC strictly measures dc voltage. The other diagram elements in the block diagram, the amplifiers and converters, change all the various types of applied input signals into a proportional dc voltage on which the measurement is made. The numerical measurement of the dc voltage value is then proportionally re-scaled back to the proper numerical representation of the applied signal.
The ADC is the central measurement unit of the digital multimeter. There are many types of ADCs, each designed to make a measurement with different strengths and complimenting weaknesses relating to measurement precision, speed, and other characteristics. These different methods of digitizing use various designs based on differing technologies and digitization methods.
Dual ADC architecture
Given the needs for both measurement precision and measurement speed, the 8588A and 8558A digital multimeters are unique in their design. These digital multimeters have two ADCs to provide the best performance over a broad range of applications. These are a Charge Balance Integrating ADC and a Successive Approximation Register ADC.
The Charge Balance ADC (or CB ADC) provides the highest measurement accuracy, and it is designed for precision measurements to deliver the most accurate multimeter. Such a design has been used in all of Fluke’s recent generations of precision digital multimeters. This particular design is set up with a 28-bit ADC, using an integrating, multi-slope digitization approach. With such a design, the windows of measurement where the digital multimeter is actively measuring the signal range from 100 microseconds to 10 seconds. It measures with resolution of up to one part out of 2×10^8 of the selected measurement range.
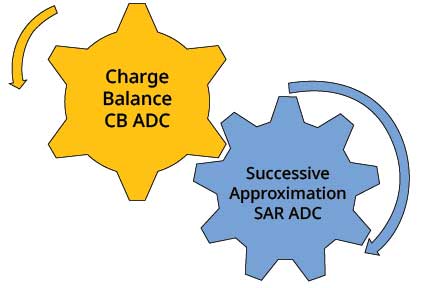
The Successive Approximation Register ADC (or SAR ADC) is designed with 18 bits of resolution and is optimized for speed, able to take 5 million samples per second. This sampling rate permits measurements every 200 nanoseconds. This is a 6.5 -digit measurement, with a sensitivity of one part out of 2 × 10^6 of the selected measurement range.
The ADCs are primarily used for specific measurement functions. The CB ADC is used for high precision measurements of dc voltage, dc current, resistance, and capacitance. The SAR ADC is automatically used in the digitize voltage and current functions as well as for AC V and AC I measurements.
Charge Balance ADC linearity and stability
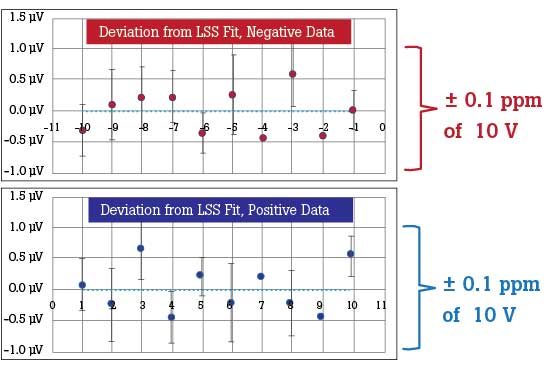
The Charge Balance ADC is extremely linear – one of the best, if not the best linearity performance of all ADCs used in test instrumentation. The measurement short term stability and repeatability together with linearity give the CB ADC its excellent measurement performance. During development of the digital multimeter series, the Fluke engineering and metrology teams evaluated the dc V performance by measuring a 10 Volt Josephson Junction System. Measurements were made in the 10-volt range, at one volt steps, from 1 volt to 10 volts, and testing both positive and negative polarities. The results are shown below. The maximum linearity deviation was ±0.64 uV.
| JJ Array | [Volts] | -10 | -9 | -8 | -7 | -6 | -5 | -4 | -3 | -2 | -1 |
| Lin Dev | [µv] | (0.31) | 0.11 | 0.22 | 0.24 | (0.35) | 0.27 | (0.42) | 0.60 | (0.39) | 0.03 |
| [µv/v] | 0.03 | (0.01) | (0.03) | (0.03) | 0.06 | (0.05) | 0.10 | (0.20) | 0.19 | (0.03) |
| JJ Array | [Volts] | 1 | 2 | 3 | 4 | 5 | 6 | 7 | 8 | 9 | 10 |
| Lin Dev | [µv] | 0.07 | (0.25) | 0.64 | (0.48) | 0.21 | (0.23) | 0.18 | (0.23) | (0.45) | 0.54 |
| [µv/v] | 0.07 | (0.12) | 0.21 | (0.12) | 0.04 | (0.04) | 0.03 | (0.03) | (0.05) | 0.05 |
Comparing the test results to the guaranteed specifications, the CB ADC performance on the 10-volt range exhibited an error of less than half (41%) of the allowable/expected error as defined in the published transfer specification. The transfer specification is the tightest published specification, defining the maximum measurement error valid within a 20-minute period – a relative spec, independent of added traceability uncertainties. This effectively details the combined linearity, short term stability, and repeatability errors for a measured point.
The measured errors on the digital multimeter versus the J-Array System was seen to be about ±6 units of the least significant digits for the 10-volt measurement as shown in the 8.5-digit display. This compares to the published transfer specification for this point, which allows for a maximum ±12 digits at the guaranteed 99% confidence level.
This test result confirms the capability of the Charge Balance ADC for very accurate and precise measurements. This fundamental performance of CB ADC lets it be used for precision dc voltage and current measurements as well as ohms.
Successive approximation registers ADC measurement performance
The SAR ADC is optimized for speed. The SAR ADC found in the newest digital multimeters is designed with 18 bits of resolution within the measurement range. As to be expected, the specified accuracy is appropriately reduced from comparable measurements made with the CB ADC. However, the measurement speed is much faster. Measurement samples are available at a 5M samples-per-second rate. This is 50 times faster than what older technology precision digital multimeters achieved with their 100k/second measurement rates. The bandwidth of the SAR ADC is 20 MHz, so the measured signals can have higher frequency components that are readily measured. (For comparison, the bandwidth of the CD ADC is in the low tens of kilohertz.)
The key use of the SAR ADC is to capture a continuously varying analog signal in a sequence of measurements taken at discrete time intervals. In addition, the digital multimeter has extensive triggering and timing capabilities to allow precise capture of the data. Furthermore, the digital multimeter also has a variety of measurement analysis capabilities so the captured data can be transformed into even more useful information.
To manage this amount of measurement information, up to 15 million measurements can be stored in the digital multimeter. Measurements can even be stored with an optional time stamp. Measurement data can be downloaded in real time (at up to a 100 kHz data rate) via the computer interface, or the stored data can be downloaded at a later time. In addition to downloading via a direct connection, it can also be transferred via USB to an external storage device.
Overview of measurement speeds
Depending upon the application needs, a user can configure the digital multimeter to use the CB ADC to provide up to 8.5 digits of resolution at measurement times ranging from 100 microseconds to 10 seconds. Alternatively, the digital multimeter can be configured to use the SAR ADC for a measurement of 6.5 digits of resolution at measurement times based on sample times of 200 nanoseconds. Selecting the measurement speed is done by a combination of the selected measurement function used and the selected measurement aperture time.
Aperture overview and description
Measurement time is based on the time the ADC is actively measuring the signal. This time is configured through the parameter called Aperture Time. For either ADC the aperture time has similar but different considerations.
In general, the longer the measurement time, the better the noise rejection and the more improved is the quality of the measurement value. Effectively, the longer time relates to a longer integrating or averaging method used to form a measurement value. One benefit is the removal of random noise related influences. On the other hand, the faster the measurement time, the better the measurement reflects an instantaneous value of an analog signal which is changing over time. This helps to quantify short term variations in the parameter being measured.
Aperture settings with the CB ADC
The aperture time on the Charge Balance ADC is used to make measurements using an integrating conversion method with aperture times ranging from 100 microseconds to 10 seconds. The appropriate aperture setting can be automatically set up by selecting the desired resolution of the measurement and the relative measurement speed needed for the measurement. Alternatively, a specific aperture time can manually be selected if required.
Higher resolution measurements require longer aperture times. The desired resolution is selectable, with settings of either 4, 5, 6, 7 or 8 digits. (These are often also referred to as resolutions settings from 4.5 digits to 8.5 digits.) Additionally, each resolution can have either a normal speed or a faster speed-reading rate. The normal speed has the better-quality measurement. The faster speed is 5 to 10 times faster; however, it is slightly compromised with reduced noise rejection.
Automatic aperture selection
To use the auto aperture selection feature, an appropriate aperture setting is configured by selecting a desired measurement resolution and reading speed. Initially, once a measurement function is selected (dc v, dc I or ohms) the function keys are used to select the aperture of the CB ADC via resolution and speed. Table 8 shows these standard aperture settings for all automatic resolution and speed combinations. Note the PLC term refers to a single power line cycle. The time for a single PLC is 20 milliseconds for 50 Hz power systems and 16.7 milliseconds for 60 Hz power systems.
Manual aperture selection
The aperture can also be manually configured through the full range of CB ADC aperture settings, from 100 microseconds to 10 seconds. This aperture time can be set by selecting the time in seconds or the time based on the number of power line cycles (or PLCs). This ranges from 0.01 PLC to the number of PLCs equivalent to 10 seconds. In 60 Hz systems the maximum PLC aperture time would be 600 PLCs or 500 PLCs in 50 Hz power systems.
| Resolution | Auto Fast | Auto |
| 4 | 200 µs | 2 ms |
| 5 | 200 ms | 1 PLC |
| 6 | 1 PLC | 0.1 s |
| 7 | 0.2 s | 1 s |
| 8 | 2 s | 10 s |
Faster aperture times than 100 microseconds are possible with manual aperture selections. The shortest aperture time is 0 nanoseconds, increasing to 10 seconds, settable in 200 ns increments. However, the settings between 0 ns and 100 microseconds are too fast for the CB ADC, so this will cause the SAR ADC to make the measurement. Details on the SAR ADC are in the following section.
Aperture settings with the SAR ADC
The digitize aperture setting on the SAR ADC controls the measurement processes of the number of samples averaged to form the measurement value. The aperture time value controls this process, and the time value is based on the sampling time of the ADC. The SAR ADC can instantaneously capture the measurement signal following a trigger; hence 0 nanoseconds is the minimum aperture time. Furthermore, the incremental time between sample conversions by the SAR ADC is 200 nanoseconds. This means that following a trigger, the SAR ADC will capture and convert the input signal and then again re-track the input signal, ready for another trigger in this 200 nanoseconds period. So, a zero nanosecond aperture time sets the SAR ADC to perform a measurement using a single instantaneous sample of the input signal.
However, because a user might want to average multiple samples into a single measurement value, the aperture time can also be used to configure this averaging process. The SAR ADC can sample and convert at a rate of 200 nanoseconds. So, two samples can be captured, converted, and averaged together in 200 nanoseconds, three samples in 400 nanoseconds, four samples in 600 nanoseconds, and so on.
The allowable range of aperture times for the SAR ADC range from 0 nanoseconds to 3 milliseconds in 200 nanoseconds increments. To illustrate this range, an aperture time setting for an instantaneous sample is a 0 nanosecond setting, or an average of 10 samples is an 1800 nanoseconds aperture setting, or the maximum of 15001 samples is averaged with a 3 millisecond aperture time.
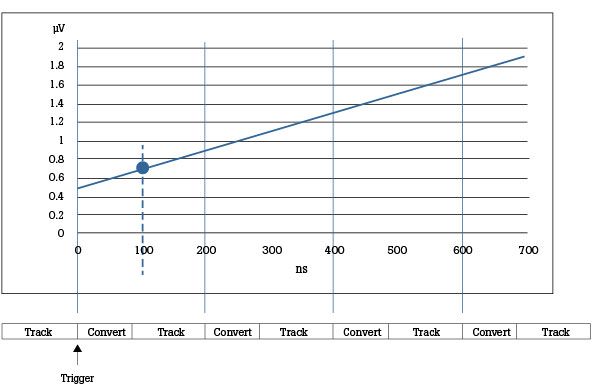
This figure shows a changing signal level (0.5 µV to 1.9 µV) vs time. If the Aperture is set to 0 ns, the sample value is 0.5 µv and the sample was captures at the time of the trigger. If the Aperture is set to 200 ns, the sample value is (0.5 µv + 0.9 µv)/2 or 0.7 µv, which is 200/2 or 100 ns after the trigger. If the Aperture is set to 400 ns, the sample value is (0.5 + 0.9 + 1.3)/3 or 0.9 µv, which is 400/2 or 200 ns after the trigger. If the Aperture is set to 600 ns, the sample value is (0.5 + 0.9 + 1.3 + 1.7)/4 or 1.1 µv, which is 600/2 or 300 ns after the trigger.
As described, when using the SAR ADC, depending upon the application, the number of samples averaged to form one measurement value in the digitize functions is directly controlled by the value set for the aperture time setting.
In summary, the aperture time is the main controlling factor on the speed and style ADC conversion for the measurement. Depending upon the need for a high precision measurement of a stable signal, where the CB ADC is the preferred technique, or the need for digitization of instantaneous values of a varying analog signal, where the SAR ADC preforms best, it is the aperture time which is a key parameter that configures the digital multimeter for optimum measurement performance.
Triggering
Triggering is the method of synchronizing the digital multimeter acquiring a measurement to a specific event or action so the measurement or series of measurements can be related to specific conditions. In its simplest mode, triggering can be in a free condition manner automatically acquiring a series of individual consecutive measurements.
Another basic triggering setup is to acquire a single measurement via a manual front panel keystroke or via some independent type of trigger signal. In a more sophisticated scenario, the digital multimeter’s measurement acquisition can be enabled through various independent events. These include computer-controlled automation, or synchronization to independent outside events, or waiting for required amounts of time, or when a certain signal condition is observed on the measurement terminals. For maximum flexibility multiple events can be combined and sequentially organized so a series of specific events will initiate single or multiple measurements. In this section we will provide a general description of the design and organization of this triggering system.
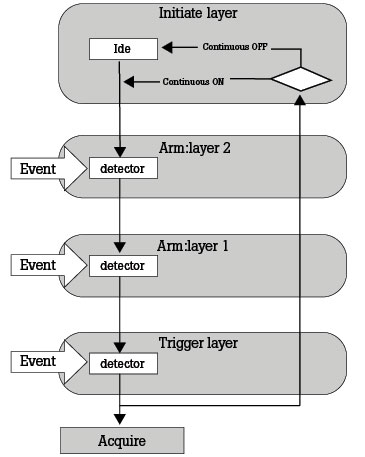
The digital multimeter has a triggering subsystem comprised of several nested layers as shown in Figure 5. In the power-on default state, all layers are set to a state that allows the product to continuously make automatic readings. Going beyond this, the triggering subsystem can be configured to make readings in a non-continuous fashion, at very specific occurrences of one, two, or three multiple and definable events.
The Initiate layer determines whether a single shot measurement, or a repeating series of measurements will be taken. Beyond the Initiate layer, there are two Arm layers and a Trigger layer. To provide greater control of the full triggering subsystem use, these layers specify an event or multiple events that need to occur to initiate measurement acquisition.
Studying the Trigger layer illustrates the full range of capabilities. Figure 6 shows the settable aspects of the Trigger layer: Event settings (and qualifiers), Loop Counter, Event Counter, Delay, and Holdoff timer. The capabilities in Layers Arm2 and Arm1 are very similar to Figure 6.
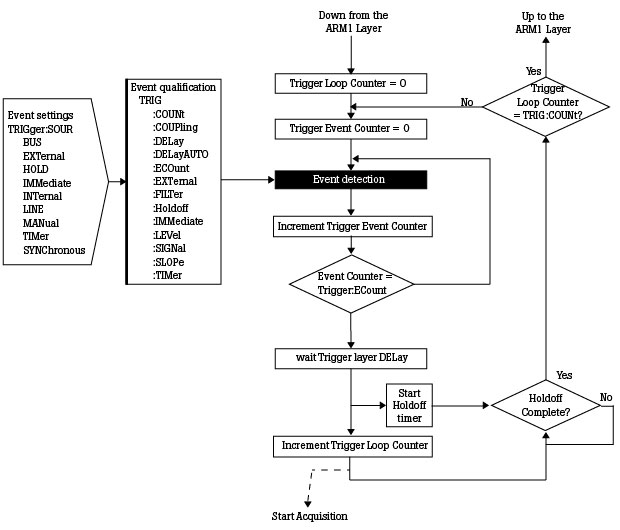
As shown in Figure 5, the nesting of these three layers permit three independent series of events to control when a measurement is acquired. It is seen that the defined sequence of events in the Arm1 layer must occur before the event sequence defined in Arm2 are done. In turn the Arm2 event sequence must complete before the Trigger Layer events are done. Finally, on the completion of the Trigger Layer sequence the measurement is initiated. However, as mentioned earlier, if a specific layer is not defined differently, its default configuration is such that it has no effect on the measurement activation process.
To illustrate how multiple layers can assist complicated triggering and timing requirements, here are examples of applications that use multiple layers in a variety of timing sequencing events.
Case 1- Controllable continuous triggering
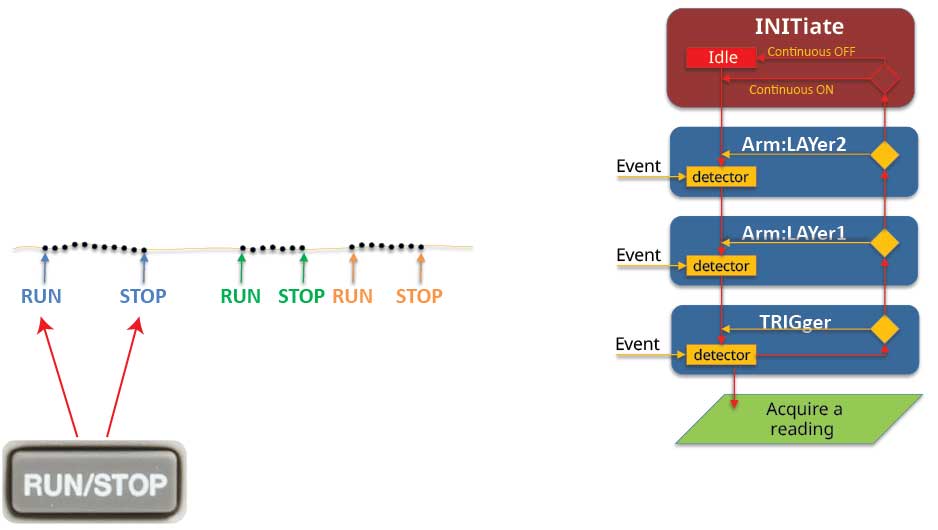
This is an example of running and stopping several series of continuous readings. In this case no external events other than the RUN/STOP control button are used in triggering these measurements. The Arm2, Arm1 and Trigger layers are simple pass-through conditions and do not add any additional conditions to control measurements. Pressing the start/stop key controls the taking of the measurements.
Case 2 – Trigger with a controlled measurement count
This application illustrates taking 100 measurements using the trigger key to initiate this process. Only the initiate and trigger layers are active. The Arm2 and Arm1 layers are simple pass-through conditions and do not add any additional conditions to control measurements. The RUN/STOP front panel button is used to stop the meter from a free run type of operation and then wait for a manual trigger done by pushing the front panel TRIG button. This configuration control is done via the initiate layer, set up to take consecutive measurements on command or stop them. The trigger layer COUNT is set to 100, so as to take 100 measurements when triggered. Once 100 are taken, the digital multimeter stops until retriggered as needed, when a different set of 100 measurements would be taken.
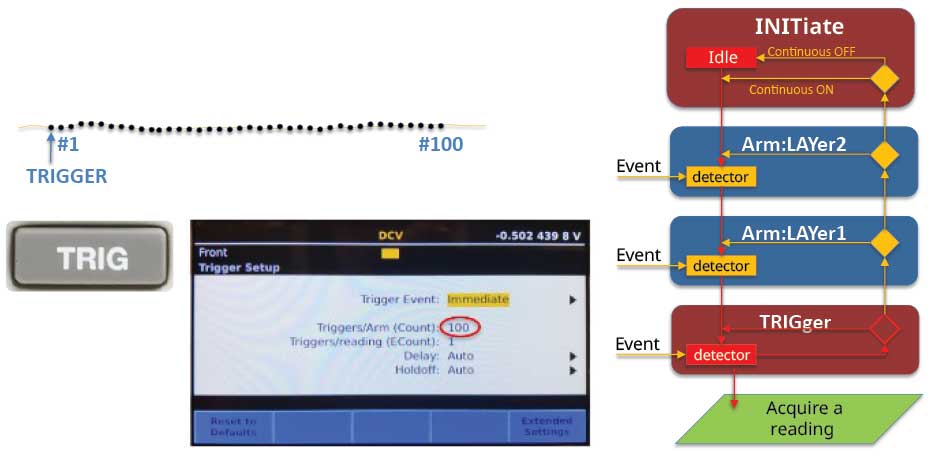
Case 3 – Trigger, delay, with a specified measurement count
This shows a similar measurement series as in Case #2 but includes a delay prior to taking measurements. The application is that a trigger is received via the front panel trigger control. After a 5-second delay one hundred measurements are taken. The initiate, trigger and arm1 layers are active in this example. The arm2 layer is a simple pass-through condition and does not add any conditions to control measurements. The RUN/STOP front panel button controls the initiate layer to take consecutive measurements on command or stop them.
To configure this process, the Arm1 layer is programmed configured for a 5-second delay. Following the front panel TRIGGER button push, its process is to pass into the arm1 layer and delays 5 seconds, then passes to the Trigger layer. The trigger layer’s COUNT is set to 100, as to take 100 measurements when triggered.
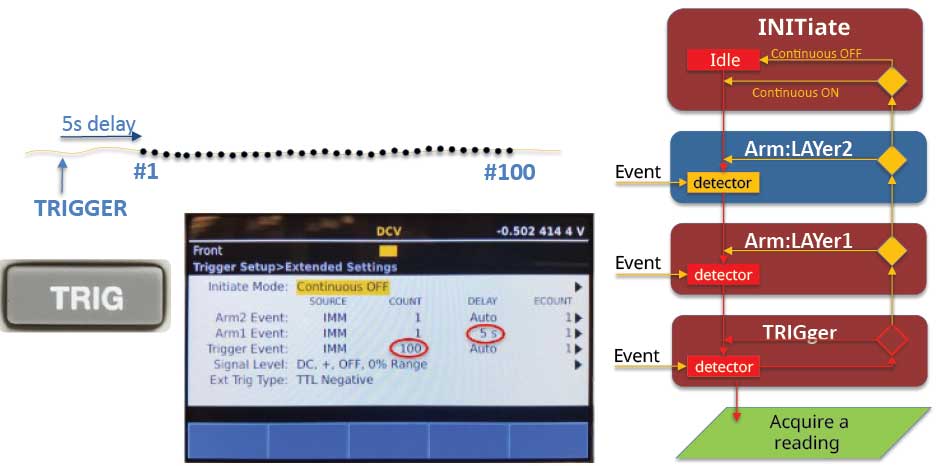
Case 4 – Repeatedly trigger a timed measurement count
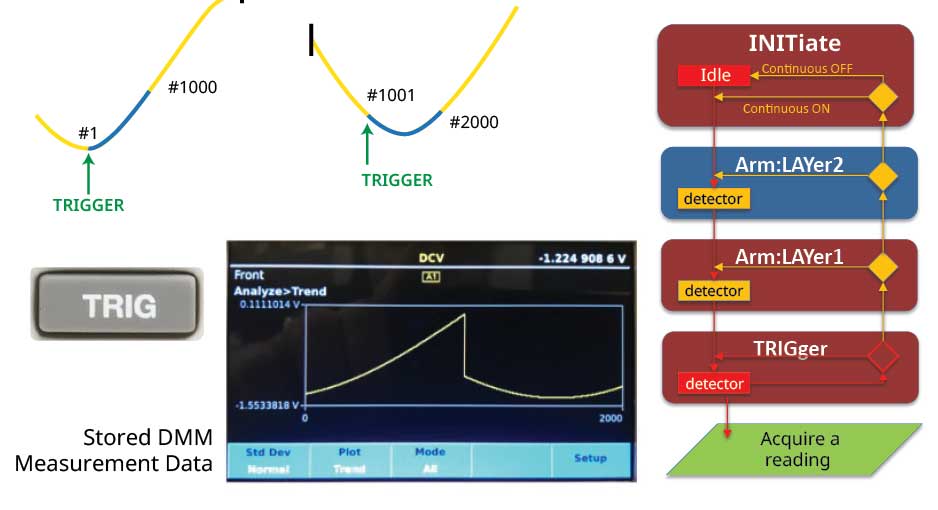
This is a scenario where 1000 readings are taken on a 1 millisecond-per-reading rate, initiated by a manual trigger. This can be repeated through subsequent triggers. A trigger is received via the front panel trigger control. 1000 measurements are immediately taken at one millisecond intervals (a 1-second-long series of measurements). The configuration of the layers in this example are the Initiate, Arm1 and Trigger. As in earlier examples, the run/stop front panel button controls the initiate layer to take individual group’s measurements on a trigger command or stop them. The Arm2 layer has simple pass-through conditions and does not add any conditions to control measurements. The Arm1 layer is configured to manually initiate readings when the TRIG button is pushed. When this trigger signal is received it drops into the trigger layer. The trigger layer is configured with a reading count of 1000, each including a delay time of one millisecond. This permits the digital multimeter to take one measurement, wait one millisecond, and then repeat. This continues until the measurement count reaches 1000. When this is done the process loops back to the Arm1 layer and waits for the next trigger. After this subsequent trigger this same process takes another 1000 measurements.
Trigger groups of 1000 readings at 1 ms interval initiated reoccurring TRIGGER keystrokes
Case 5 – Trigger with delay to measure wave shape flatness
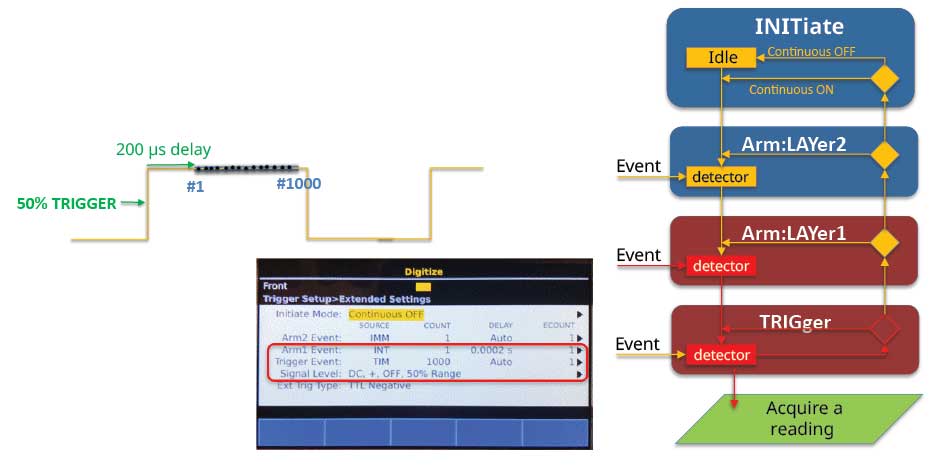
This application uses a trigger to acquire multiple readings across the top level of a square wave waveform. This would be done in the Digitize function. The intention is that after a 200-microsecond delay following the leading edge of the waveform, 1000 readings are taken at 200 nanosecond intervals. This ensures the measurements occur along the top plateau level of a square wave. Triggering is initiated at the leading edge of the wave form when the measured signal reaches 50% of the digital multimeter’s measurement range (at 0.5 volts of a 1-volt peak-to-peak square wave). When triggered there is a 200-microsecond delay before the 1000 readings are taken. Using the digital multimeter’s memory, these measurements are stored for subsequent analysis. (For example, such an analysis of the measurements could be averaged to determine the effective top level of the square wave.) To accomplish such a measurement, the trigger configuration uses the Arm1 and Trigger layers. The Arm1 layer uses the internal setting to set the trigger level to 50% of range, a positive slope transition, incorporating a 200-microsecond delay following that signal condition. The triggering control sequence would then drop into the Trigger layer to start the acquisition. The Trigger layer is configured to take 1000 measurements at a timed spacing of 200 nanoseconds between measurements. The TRIG button is pushed to begin the process of waiting for the proper trigger condition on the input signal, waiting 200 microseconds, and taking 1000 measurements.
In summary, the triggering system is extremely capable and flexible. It can be used in simple applications or in advanced/complex ones. Multiple layers permit several independent events to be used to trigger measurement operation. The default mode is simple operation for ease of use. Nevertheless, the capable advanced triggering options can make advanced measurements much easier than with existing digital multimeters that have less memory and fewer trigger capabilities.
Using the high-performance measurement systems
Taking advantage of the dual analog-to-digital converters, plus the flexibility offered by the triggering system and the analytical feature inside these digital multimeters gives users more ability for advanced measurements. Whether measuring voltage, current or resistance, it is possible to make sophisticated measurements of a signal’s characteristics in a variety of applications. This section describes the general intent of the different methods of higher speed measurement using several applications to illustrate usage of these capabilities.
High speed measurements with the CB ADC
Using the high-speed Charge Balance ADC in the 8588A and 8558A digital multimeters, combined with the triggering system and the measurement analysis capabilities, it is possible to make sophisticated measurements of waveform characteristics in many measurement applications.
Measurements using fast aperture times permit repeatedly taking single or repeated measurements with aperture times as short as 100 microseconds with excellent uncertainties. Also, shorter aperture times can be selected in a range between 100 microseconds and 0 nanoseconds in 200 nanoseconds increments using the SAR ADC.
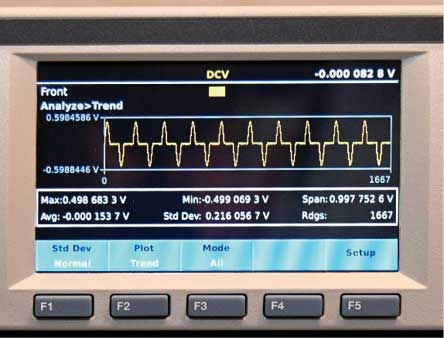
For example, if an application needs to measure the instantaneous amplitude of a 60 Hz power mains signal over a time covering 10 cycles, a 100 microsecond inter-measurement interval permits taking 167 measurements every power line cycle. Over 10 cycles there could be a total of 1667 measurement points to examine. With the digital multimeter configured to capture this instantaneous measurement data, and its advanced analysis capabilities, this can be readily done.
Such measurement data can be displayed graphically, analyzed both for its general measured characteristics as well as statistically analyzed. It is also possible to do some frequency domain analysis. Such signal processing in the digital multimeter has not been possible with any other high performance digital multimeter up to this time.
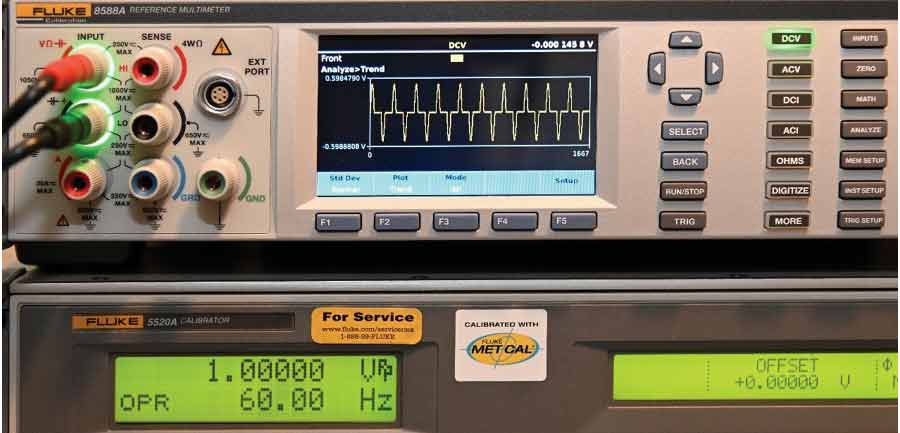
In this example, instantaneously measuring a voltage over ten line cycles is required. Rather than using the ac voltage measurement function that only indicates the RMS value of the overall waveshape, high speed dc voltage measurements are to be made along various points of the waveshape. This gives abilities to both analyze and display the measured signal.
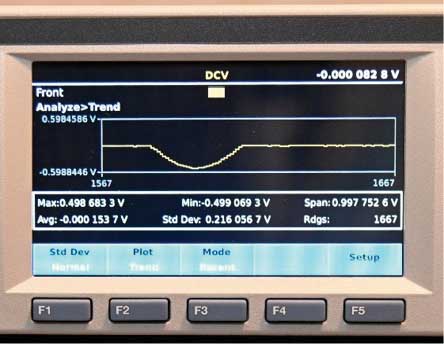
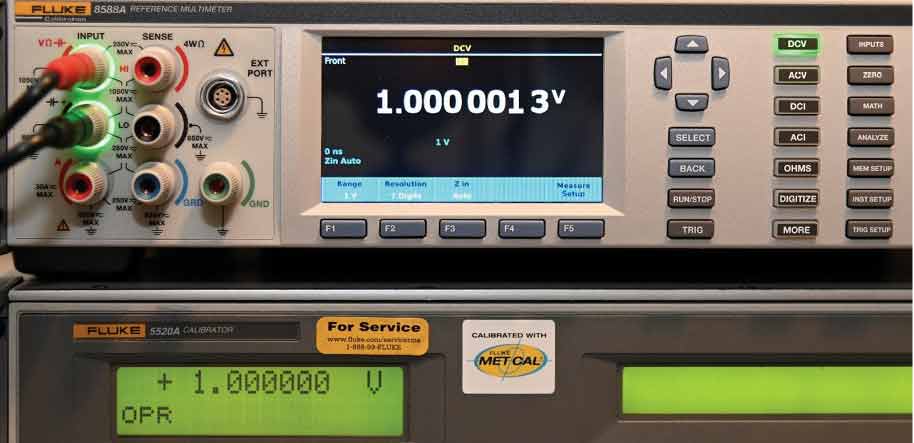
An appropriate measurement setup could be to use the dc voltage function at its fastest aperture setting of 0 nanoseconds. Taking 1667 measurements at 100 microsecond intervals would detail ten cycles of this 60 Hz waveform. In this example we will measure a 1-volt peak-to-peak, 60 Hz distorted sine wave signal. The following figure illustrates the setup with a display of the measured waveshape as simulated using a voltage calibrator.
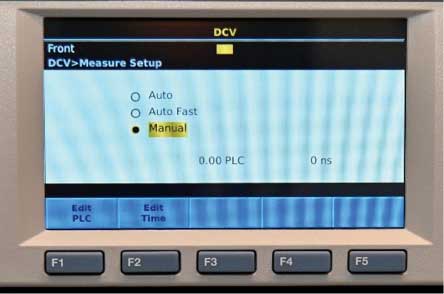
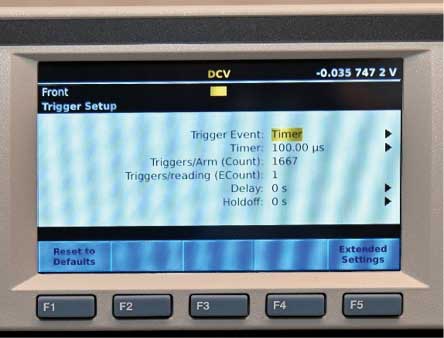
The digital multimeter measurements are triggered at 100 microsecond timing with the following settings:
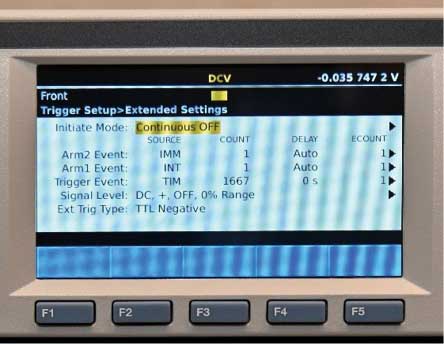
A graphical display of the completed measurement along with analysis information can be displayed on the digital multimeter as seen below, along with an expanded view of the most recent 100 samples, if desired:
Example B: High speed dc v measurements of noise on a dc voltage signal
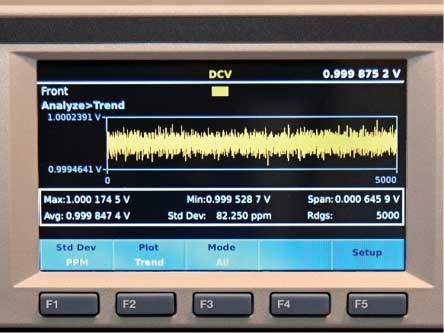
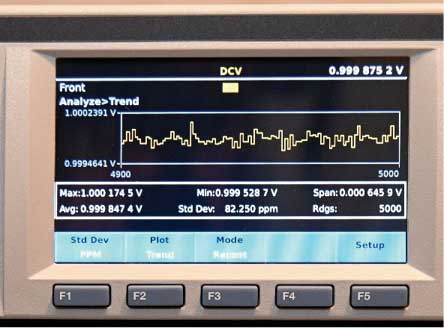
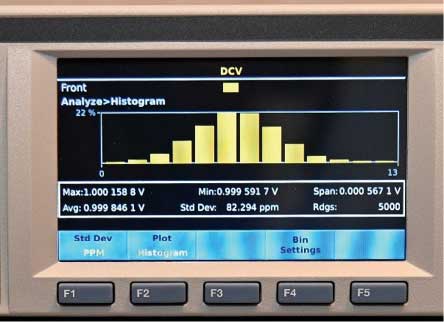
By reducing the digital multimeter’s input filtering, the noise rejection of a digital multimeter can be effectively eliminated, permitting analysis of the noise on a signal. The following example illustrates both digital and graphical measurements with noise analysis. 5000 measurements will be taken, with a 0 nanosecond aperture time, at 100 microsecond intervals of a 1-volt dc signal.
The following figure illustrates the setup with a display of this measurement:
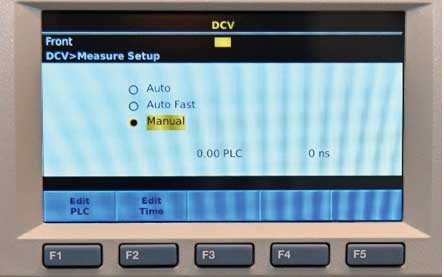
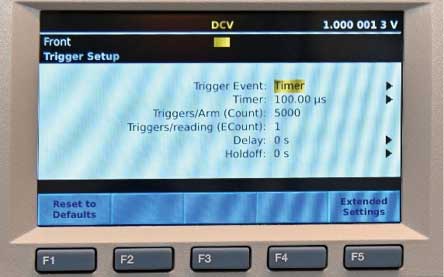
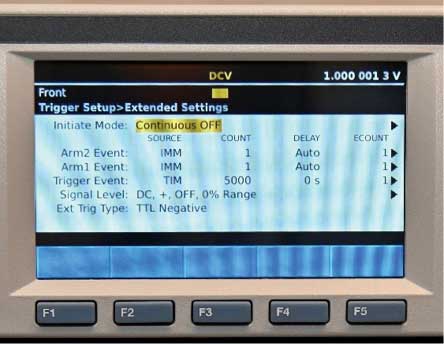
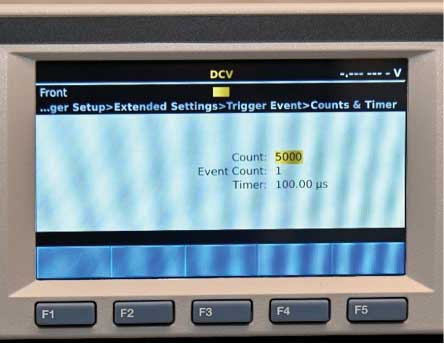
The 5000 digital multimeter measurements are triggered at 100 microsecond timing with the following settings:
A graphical display of the completed measurement along with analysis information can be displayed on the digital multimeter as seen below. The plot of the measurements taken over 0.5 seconds is shown. The statistics of the measurement series can also be seen, including the minimum, maximum, span, and average measurements, and standard deviation of the measurement set. The second screen shows an expanded view of the most recent 100 measurements. The third screen shows that a histogram of the noise distribution can also be plotted.
Digitizing measurements with the SAR ADC
Taking measurements with the Sequential Approximation Register (SAR) ADC permits faster measurements than with the Charge Balance ADC. The digital multimeter’s DIGITIZE function captures a continuous analog signal in a sequence of discrete time intervals. The 5 Mega-sample-per-second SAR ADC permits digitization of waveshapes with more flexibility and capability than any previous precision digital multimeter. With a measurement signal bandwidth of 20 MHz, the 8588A/8558A can measure signals and their variations to a high precision (6.5 digits or 18 bits of resolution), with triggering control of the measurement timing to within a few nanoseconds. Additionally, the digital multimeter measurement record buffer can store a record of up to 15 million measurements. These in turn can be stored for later retrieval and analysis. With this architecture, the digital multimeter can capture a wide range of signal waveshapes. The power of this measurement digitization capability can satisfy the needs of many different advanced testing applications.
Example C: Digitizing a triangle wave via dc voltage measurements
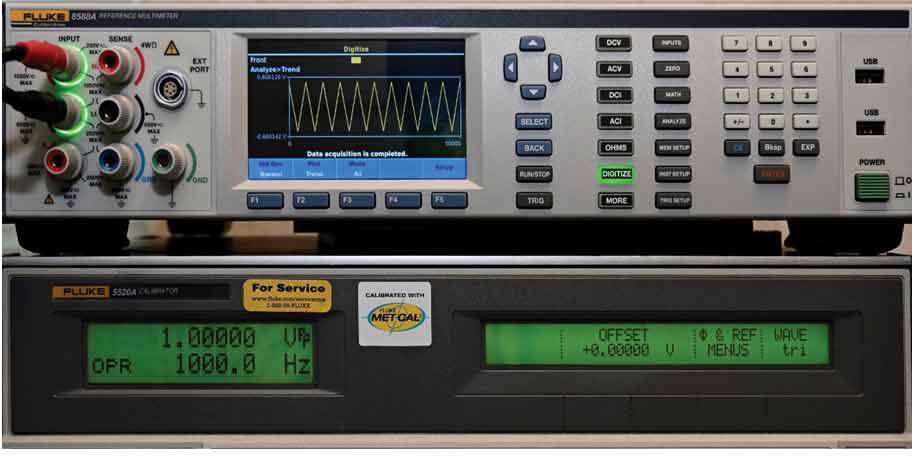
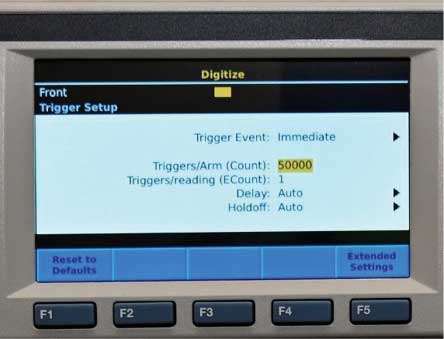
This example illustrates several aspects of the digitization capabilities of the digital multimeter. 50,000 measurements will be taken at 200 nanosecond intervals of a 1-volt peak to peak triangle wave.
Below is the setup screen that configures the measurement details. It illustrates key settings of the trigger method and number of measurements among other related settings.
The first screen below illustrates other configuration information, such as the filter setting, the aperture setting of 0 nanoseconds, sample count and other measurement settings.
It is taken as the digital multimeter is waiting to initiate the measurements. The second screen also shows the screen once the measurements have been initiated, the full capture process is complete, and the measurement data has been transferred into memory.
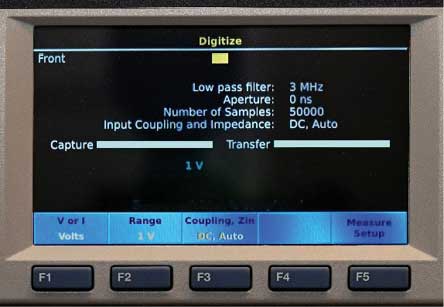
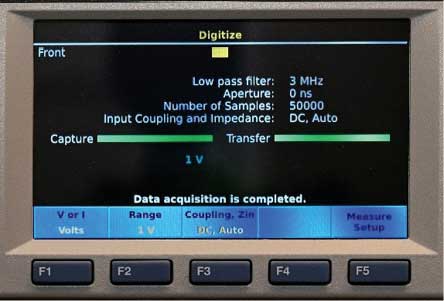
This illustrates the example measurement setup as well as the resulting display of the measured waveshape:
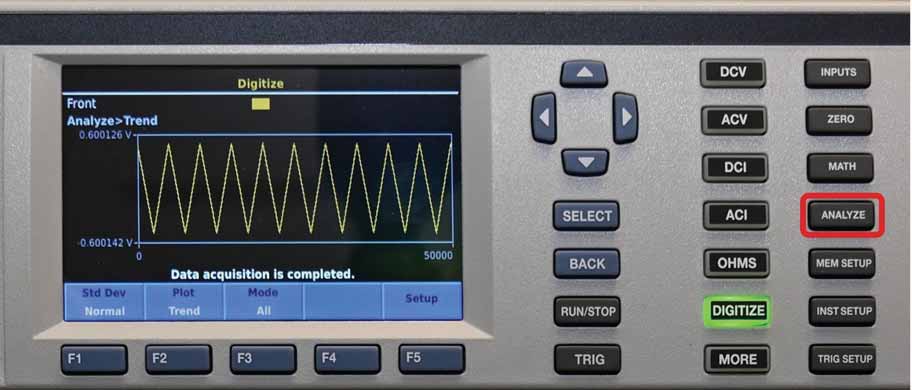
Displaying and analyzing the digitized measurement
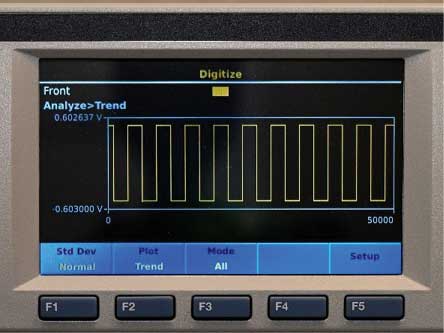
Following digitization, pressing ANALYZE will display the digitized measurement graphically in a time or frequency manner. The image below shows a TREND plot where the data in a time-based graphical image.
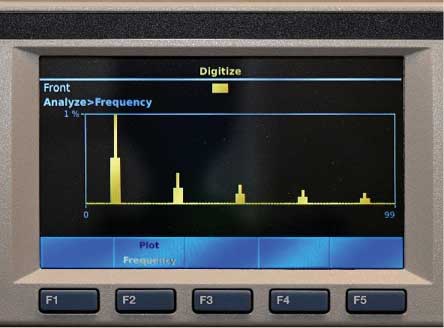
The following two images illustrate both the trend plot and the frequency plot of a square wave signal. This has been similarly digitized as the triangle wave that is shown above. (For illustrative purposes, a square wave has more distinct frequency components than a triangle wave.)
Management of measurement records
Measurement records of the digital multimeter can be stored as records for analysis purposes, independent of which measurement or digitization function is used. These measurement records can be stored in non-volatile memory and later accessed for analysis outside of the digital multimeter via a USB memory stick or directly with a computer via the digital multimeter’s remote-control interface.
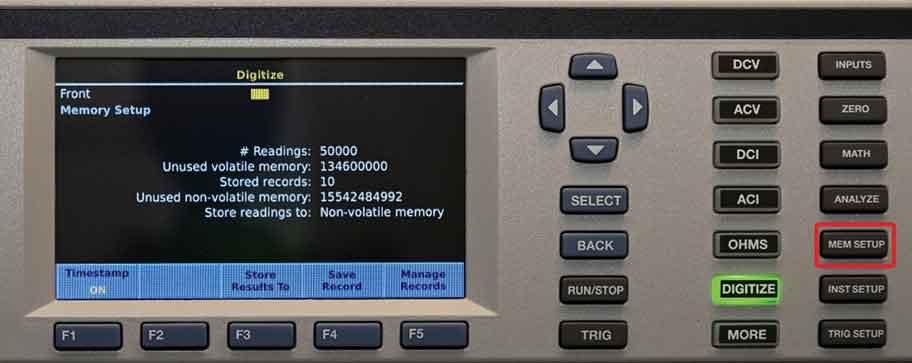
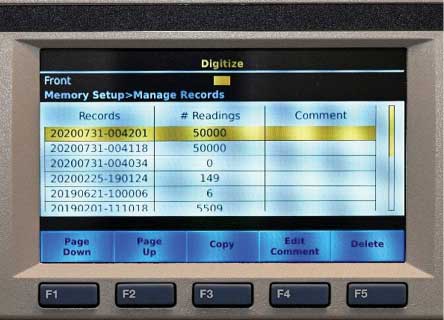
The screens show the record management done via the MEM SETUP key on the front panel. The five function keys illustrate the management actions that are available. The second screen illustrates record management. Multiple records stored in the digital multimeter can be accessed, managed, and selected for downloading for further analysis.
At Fluke, we’re proud to offer you our most accurate multimeters. Learn more and request quotes at the 8588A and 8558A product pages.
Continue learning
- Home
- Products
- New Products
- Electrical Calibration
- RF Calibration
- Data Acquisition and Test Equipment
- Temperature Calibration
- Humidity Calibration
- Pressure Calibration
- Flow Calibration
- Process Calibration Tools
- Calibration Software
- Service and Support
- All Calibration Instruments
- Handheld Test Tools
- Purchase Info
- News
- Training and Events
- Literature and Education
- Service and Support
- Service Request (RMA)
- Service Plans
- Technical Support
- Knowledge Base
- Accreditations
- Authorized Service Centers
- Calibration Certificates
- Community Forum
- My MET/SUPPORT
- Product Manuals (User Guides)
- Safety Data Sheets (SDS)
- Recycle Program
- Safety, Service, and Product Notices
- Software Downloads
- Warranties
- Tools
- About Us

