- Otras empresas de Fluke:
- Fluke
- Fluke Biomedical
- Fluke Networks
- Fluke Process Instruments
Uncertainty Budgets for IR Temperature Measurement – An Overview
Abstract
In the field of infrared (IR) temperature measurement, accuracy of temperature measurements has not been as good as it is in contact temperature measurement. This is true for measurements made with thermal imagers as well as measurements made with handheld IR thermometers. In fact, many thermographers are not as interested in the measured temperature of an object as they are in the differences in temperature in the imager’s field of view. However for various reasons such as regulation and accreditation, knowledge of the accuracy of measurements may be necessary.
To determine the accuracy of measurements, it is necessary to do a calibration on the measuring instrument. Just as important is creating an uncertainty budget for that instrument. The calibration gives the instrument an agreement to an established standard. The uncertainty budget tells the user how close to that agreement the user can expect his instrument to be on a repeated basis.
This paper discusses the elements needed for an IR thermometry uncertainty budget, especially as it relates to thermal imagers. It introduces a measurement equation and discusses how to apply that equation to measurements made with imagers. It discusses how to structure an uncertainty budget so it can be understood by other thermographers and assessors.
Introduction
Although many applications using IR thermography or IR thermometry do not require knowledge of temperature measurement accuracy, there are some applications that do. For applications that do, a standardized method should be used to determine accuracy. An accepted method of determining the accuracy of a measurement is to prepare an uncertainty budget. This paper is intended as an overview of the information necessary to put together an uncertainty budget that will be acceptable to describe the accuracy of IR measurements.
1. Background
The information in this paper is based in a large part on the experience of constructing uncertainty budgets for IR thermometry at Fluke Corporation Hart Scientific Division.
The purpose of doing an uncertainty budget for any type of measurement is to determine the accuracy of that measurement. A properly calculated uncertainty budget reveals the accuracy of measurements and gives a means of communicating this understanding.
In IR thermometry, accuracy is often not a large concern to the users of this technology. This is the case with the users of IR thermometers. This is the case with the users of thermal imagers as well. However, there are occasions where knowledge of these instruments' accuracy is needed. There are a number of reasons to perform an uncertainty budget. Some industries require calibration on all pieces of measurement equipment. Sometimes that requirement can be of a legal nature. Some may be just to determine the accuracy of a measurement.
To begin this discussion, there are a few concepts that should be understood.
For temperature measurements, accuracy is the “closeness of agreement between the result of a temperature measurement and a true value of the temperature” [ASTM E 344-02]. In the case of temperatures up to about 960C, these standards (or true values) are defined by a set of fixed points (usually pure metals or pure water). In the US, these standards can be calibrated by NIST. Points between these fixed points are often defined by the ITS-90 temperature scale. In fact, the ITS-90 is considered as a standard temperature scale for calibration of PRTs [Nicholas & White].
Not to be confused with accuracy is repeatability. Repeatability is the ability to get the same results for a measurement during repeated measurements. In temperature measurement, it is “closeness of agreement between the results of successive measurements of the same temperature carried out under the same conditions of measurement” [ASTM E 344-02]. This is not the same as accuracy. A set of measurements may have a repeatability of 0.2°C. However, if all of these measurements are 1.0°C from what standards traceable to national laboratories indicate they should be, then they are actually less accurate than they are repeatable.
Traceability fixes an instrument’s measurement to a standard [Nicholas & White]. If its calibration is traceable, it will have been compared or calibrated to a standard. This standard may have been calibrated at a national laboratory, or it may be traceable to a national lab.
The uncertainty budget guideline that is followed in this paper is the Guide to U. S. Guide to the Expression of Uncertainty in Measurement commonly referred to as the GUM. It is recommended that anybody calculating uncertainty budgets have this guideline and follow it.
2. IR Uncertainty Budget Elements
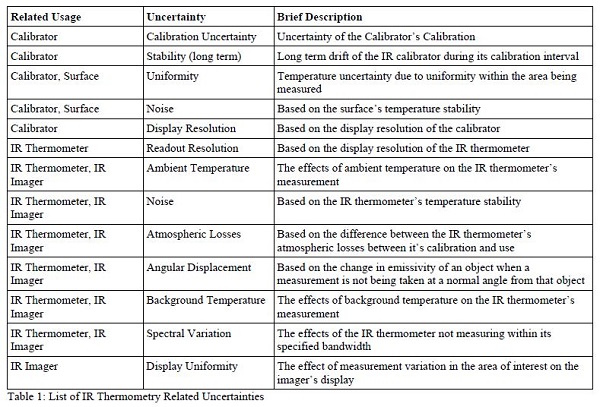
In order to properly define the accuracy of a calibration or a measurement, an uncertainty budget should be performed. To do a proper uncertainty budget, any item that would influence a measurement should be considered [GUM]. A basic list of uncertainties for IR temperature measurement is listed in Table 1. These uncertainties can be used for uncertainty budgets for IR thermometer and imager calibration as well as IR thermometer and imager use. Some of these uncertainties do not apply in all cases. This list does not include aperture related uncertainties which will not be discussed in this paper. Apertures are often used in high end IR thermometry to reduce the effects of scatter on measurements.
3. IR Uncertainty Budget Structure
Having the correct uncertainty budget structure allows communication of uncertainties to people outside one’s organization. The following section gives basic information on necessary elements to an uncertainty budget.
3.1. Type 'A' Uncertainties and Type 'B' Uncertainties
Uncertainties are divided into two categories, Type ‘A’ and Type ‘B’. Type ‘A’ uncertainties are those determined by statistical methods. Type ‘B’ uncertainties are those not determined by statistical methods.
An example of an uncertainty determined using statistical methods is the following. Repeatability needs to be determined for an uncertainty budget. A number of measurements is taken from a known temperature source. These measurements are compared to each other. The uncertainty for repeatability is based on this comparison.
A couple of examples of uncertainties not determined by statistical methods are the following. One example would be an accuracy specification provided by a manufacturer. Another example is an uncertainty determined entirely by modeling such as using Planck’s Law to model the effects of uncertainty in emissivity.
3.2. Distributions
The two major distributions we will talk about here are rectangular and normal. There are other distributions listed in the GUM.
A rectangular distribution is one where uncertainty is distributed equally with in a set of limits. An example is an IR thermometer with an accuracy specification of ±1.0°C at 100°C. The uncertainty would be 1.0°C with a rectangular distribution. Standard deviation for a rectangular distribution can be determined by dividing the rectangular distribution by the square root of 3 (~1.7).
A normal distribution is often known as a bell curve or a Gaussian distribution. It predicts roughly 68% of measurements will fall within one standard deviation, and roughly 95% of measurements will fall within two standard deviations. The following is an example of a normal distribution. 20 measurements are taken to determine repeatability. 19 of the measurements (95%) fall within ±0.4°C. This means if the samples have a normal distribution, they have two standard deviations of 0.4°C.
Standard deviation can easily be determined by the use of a spread sheet program such as MS Excel. In Excel, this is accomplished by the STDEV() function. This will give you one standard deviation. To get a number for 2 standard deviations, simply multiply this number by 2 (2*STDEV()).
A brief note about the term ‘k’ of coverage factor in uncertainty budgets, a k=1 uncertainty means it has a normal distribution and has been stated as 1 standard deviation. Likewise, a k=2 uncertainty means the uncertainty has been stated as 2 standard deviations [Nicholas & White].
3.3. UC udget Explanations
An uncertainty budget should come with an explanation for each uncertainty. This makes understanding the uncertainty budget easier for auditors and customers. Table 1 gives some basic uncertainty budget explanations, although, more elaboration may be given for an explanation.
4. IR Math
One of the biggest challenges of calculating uncertainties for IR thermometry is dealing with the math. This is due to the complex mathematical and physical nature of the IR measurement system. 4.1. Measurement Equation An uncertainty budget should be based on a measurement equation [GUM]. The way an IR thermometer or imager calculates temperature is based on detector signal. This is true whether the instrument under test is being calibrated or being used for temperature measurement. A basic measurement equation for IR temperature measurement is shown in Equation 1. This is a simplified equation. It should be noted that each of these terms is influenced by the factors shown in Table 1. For example, the signal for any measurement depends on both the background temperature (TBG) and the temperature of the object being measured (TSURF).
4.2. Planck's Law
Radiation is what an IR thermometer measures. Radiance is modeled using Planck’s Law [DeWitt & Nutter]. Although not much explanation will be given on how to mathematically apply this equation in all situations, knowledge of how the different elements of Planck’s Law can influence uncertainty is important. For example, the term λ refers to wavelength. This indicates that spectral variation or the bandwidth limit variation of the optical system should be considered.
It should be noted that the L (spectral radiance) in Equation 2 is related to and is proportional to the S (signal) in Equation 1.
4.3. SH Equation
One alternative to using Planck’s Equation that has been suggested is the Sakuma-Hattori Equation [Saunders et al] shown in Equation 3. It is problematic for the user of handheld industrial type instruments in that the A, B and C constants are most likely not provided for these instruments. 4.3. SH Equation One alternative to using Planck’s Equation that has been suggested is the Sakuma-Hattori Equation [Saunders et al] shown in Equation 3. It is problematic for the user of handheld industrial type instruments in that the A, B and C constants are most likely not provided for these instruments.
4.4. IR Math Made Simple
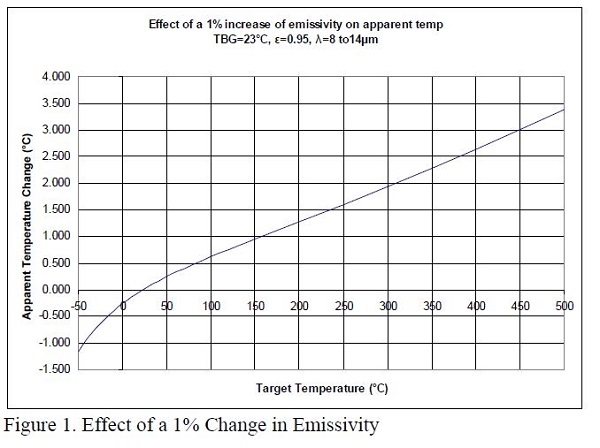
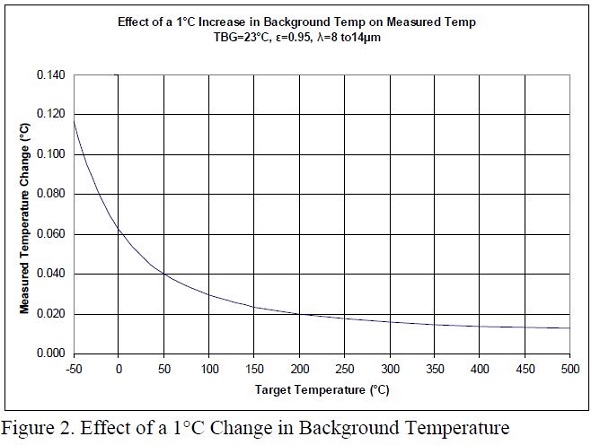
Planck’s Law is rather complicated. If the 8 to 14 μm band is being used for measurements, the equation must be evaluated over the instrument’s bandwidth. This is not a trivial task, since the equation turns into an integral that must be solved numerically. For many uncertainties not determined by statistical methods, a mathematical calculation must be made. Instead of mathematically calculating the effects of uncertainty in items such as emissivity uncertainty, background temperature and the effects of scatter, there are sources which provide charts and graphs to simplify these calculations [ASTM E 1256-95, Fluke, Mikron]. Two examples of graphs which can be used are shown in Figures 1 and 2. They are based on numerical modeling of Planck’s Equation done at Hart Scientific and show the effects of uncertainty in emissivity and background temperature.
5. IR Uncertainty Budget Calculation
With the knowledge described here, it is possible to calculate an uncertainty budget.
For any independent or uncorrelated uncertainties a sum of squares can be used [GUM]. It any of the factors are correlated, they must be calculated by summing the components. An example of a simple uncertainty budget calculation is shown in Equation 4. In this example, all uncertainty budget items are uncorrelated, so a sum of squares is used. Note that u1 and u3 follow a normal distribution, so they are divided by 2 since they are k=2 uncertainties. The term u2 is divided by the square root of 3 since it follows a rectangular distribution.
The sum of squares gives the k=1 or combined standard uncertainty represented by a lowercase ‘uc’. Multiplying this number by 2 gives the k=2 uncertainty or the combined expanded uncertainty represented by an uppercase ‘U’ [GUM].
5.1. Emissivity – How Bad Can It Be
One component that should always get special attention in an IR uncertainty budget is emissivity. In order to make accurate temperature measurements, the emissivity of the surface or cavity being measured should have a determined emissivity. This is true when using an IR thermometer to make measurements, and it is especially true when calibrating an IR instrument.
A relationship between emissivity change and measured temperature change can be mathematically modeled. The results of one such exercise is shown in Figure 1. Note that at ambient background temperature, emissivity has no effect. The graph in Figure 1 shows the effects of a 1% change in emissivity. It is not a stretch to see how much worse the effect is when there is an uncertainty of several percent in emissivity.
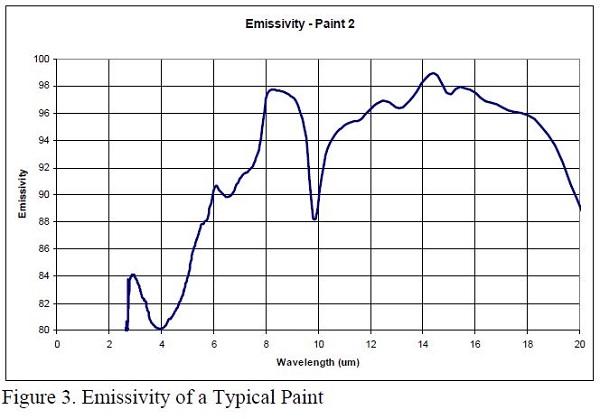
Another thing to keep in mind when considering emissivity is that surfaces do not exhibit a constant value for emissivity over all wavelengths. In other words, these surfaces are not gray [DeWitt & Nutter]. This becomes a problem when using two instruments with different spectral responses. An example of a non-gray surface is shown in Figure 3. This emissive spectral response is typical of paints. The graph in Figure 3 was measured by Fourier transform infrared (FTIR) testing [Hannsen et al].
5.2. IR Thermometer Example Uncertainty Budgets
An example uncertainty budget for an IR thermometer calibration is shown in Table 2. Due to demonstrational purposes, it only considers 1 temperature. In a complete uncertainty budget, a number of temperatures reflecting the range of measurement should be evaluated. Note that these uncertainties correspond to those listed in Table 1. The equation used to sum the uncertainties is shown in Equation 5. The MS Excel formulas used to sum these uncertainties are shown in Equation 6. The MS Excel formula contents for rows correspond to the rows of Table 2. For example Row 4 is the ‘Uniformity’ row and Row 15 is the ‘Spectral Variation’ row. Column E is the ‘Divisor’ column, and Column F is the ‘100°C’ column.
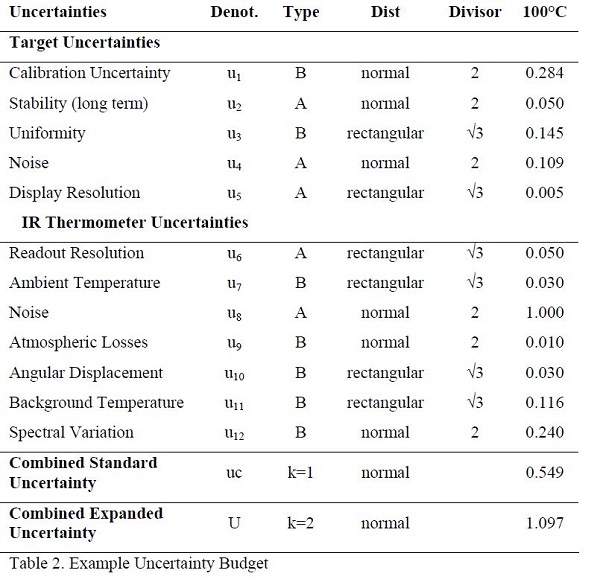


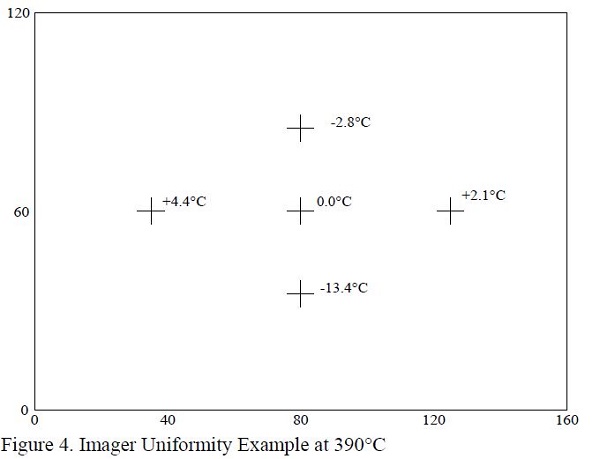
Imager uncertainty budgets should be similar to the one shown in Table 2. However, an additional uncertainty should be considered. Most imagers undergo a non-uniformity correction (commonly called NUC). This helps to correct for temperature uniformity errors across the display of the imager. However, this correction does not completely solve nonuniformity problems. This problem has been documented in a previous paper [Thomas et al].
This uniformity uncertainty is rather easy to evaluate experimentally. An object of known temperature can be measured at different parts of the display that is used to measure temperature. The results of one such test is shown is Figure 4. In this test two objects of similar temperature were placed next to each other. A thermographic image was taken. Then the objects’ positions were switched and a second thermographic image was taken. The uniformity is evaluated by taking the sum of the temperatures measured in a given position, then subtracting the sum of the temperatures in the center of the display. When this result is divided by two, the difference in measured temperature on the display is given, since the difference in the temperature of the two objects cancels. This method is similar to a uniformity test for dry-wells outlined in an accepted standard [EA 10/13]. An example of the math involved is shown in Equation 7.
Conclusion
Constructing an uncertainty budget for IR temperature measurement is not a trivial task. However, by paying attention to the uncertainties involved in a measurement an uncertainty budget is a powerful tool. A properly constructed uncertainty budget will give knowledge of the accuracy for a given measurement. It will also portray this accuracy to colleagues and auditors.
Acknowledgments
The author greatly appreciates the help of many people in developing this technique in calculating IR thermometry uncertainties. Among the people who have helped are Tom Wiandt, Mike Hirst and Rick Walker of Fluke Corporation Hart Scientific Division; Ingrid Gooding of Fluke; Patrick Parker, Alex Nikittin, Steve King, Medwin Schreher, Thomas Heinke and Reno Gärtner of Raytek; Leonard Hanssen, Benjamin Tsai, Sergey Mekhontsev and Howard Yoon of NIST and Kendall Johnson of the Space Dynamics Laboratory at Utah State University.
References
418X IR Calibrators Technical Manual, Fluke Corporation Hart Scientific Division, 2007.
DeWitt and Nutter, Theory and Practice of Radiation Thermometry, Wiley Interscience, New York, 1988.
E 344 - 02 in Annual Book of ASTM Standards Vol. 14.03, ASTM International, West Conshohocken, PA, 2005.
E 1256 - 95 in Annual Book of ASTM Standards Vol. 14.03, ASTM International, West Conshohocken, PA, 2005.
EA-10/13 EA Guidelines on the Calibration of Temperature Block Calibrators, European co-operation for Accreditation, 2000.
Hanssen, Prokhorov, Khromchenko and Mekhontsev, Comparison of Direct and Indirect Methods of Spectral Infrared Emittance Measurement, Proceedings of TEMPMEKO 2004, 2004.
Infrared Non-Contact Temperature Measurement, Mikron Instrument Company, No Date Given.
Nicholas and White, Traceable Temperatures, Wiley, Chichester, UK, 2001.
Saunders, Fischer, Sadli, Battuello, Park, Yuan, Yoon, Li, van der Ham, Sakuma, Ishii, Ballico, Machin, Fox, Hollandt, Matveyev, Bloembergen, Ugur, Uncertainty Budgets For Calibration Of Radiation Thermometers Below The Silver Point, Paper presented at TEMPMEKO 2007, not yet published.
Thomas, Plassmann and Jones, Reliability of Medical Thermography, Thermal Solutions 2006 Conference Proceedings.
U. S. Guide to the Expression of Uncertainty in Measurement, John A. Wehrmeyer, Chair (National Conference of Standards Laboratories, Boulder, CO, 1997). (referenced as GUM in text).
Keep learning
Temperature calibration application notes
Paid metrology and calibration training courses
Free metrology and calibration webinars
Related products
Get Help
Speak with a calibration product expert about your equipment needs
- Inicio
- Productos
- Novedades de Fluke Calibration
- Calibración eléctrica
- Calibración de radiofrecuencia
- Equipo de adquisición de datos y pruebas
- Calibración de temperatura
- Calibración de humedad
- Calibración de presión
- Manómetros de pistón
- Controladores/Calibradores
- Monitores de presión
- Balanzas de pesos muertos
- Monitores y calibradores manuales
- Handheld Pressure Calibrators
- Calibración de datos de aire
- Monitores ambientales
- Accesorios de calibración de presión
- Sistemas personalizados de calibración de presión
- Software de calibración de presión
- Calibración de flujo
- Calibradores de procesos
- Software de calibración
- Servicio y soporte técnico
- Todos los instrumentos de calibración
- Instrumentos portátiles
- Comprar
- Novedades
- Capacitación y eventos
- Literatura y educación
- Soporte Técnico
- Service Request (RMA)
- Programas de servicio
- Servicio técnico
- Base de Conocimientos
- Acreditaciones
- Centros de servicio autorizados
- Calibration Certificates
- Community Forum
- My MET/SUPPORT
- Manuales de productos (guías de usuario)
- Hojas de datos sobre la seguridad (SDS)
- Programa de reciclado
- Safety, Service, and Product Notices
- Descargas de software
- Garantias
- Sobre Nosotros

